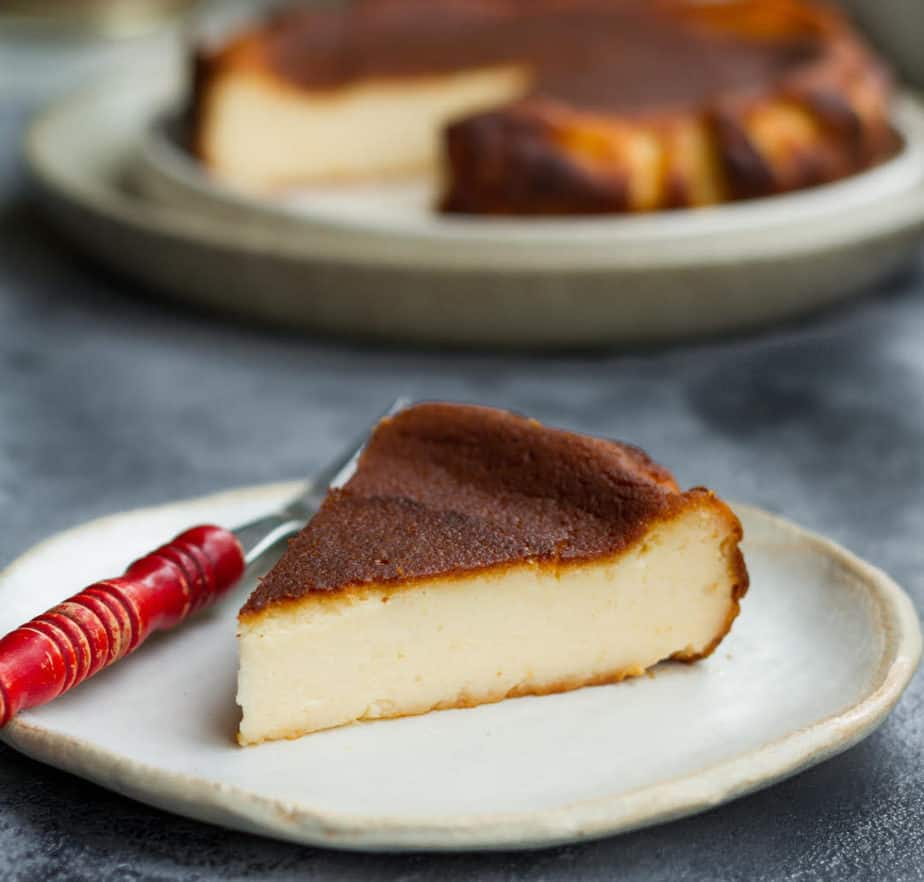
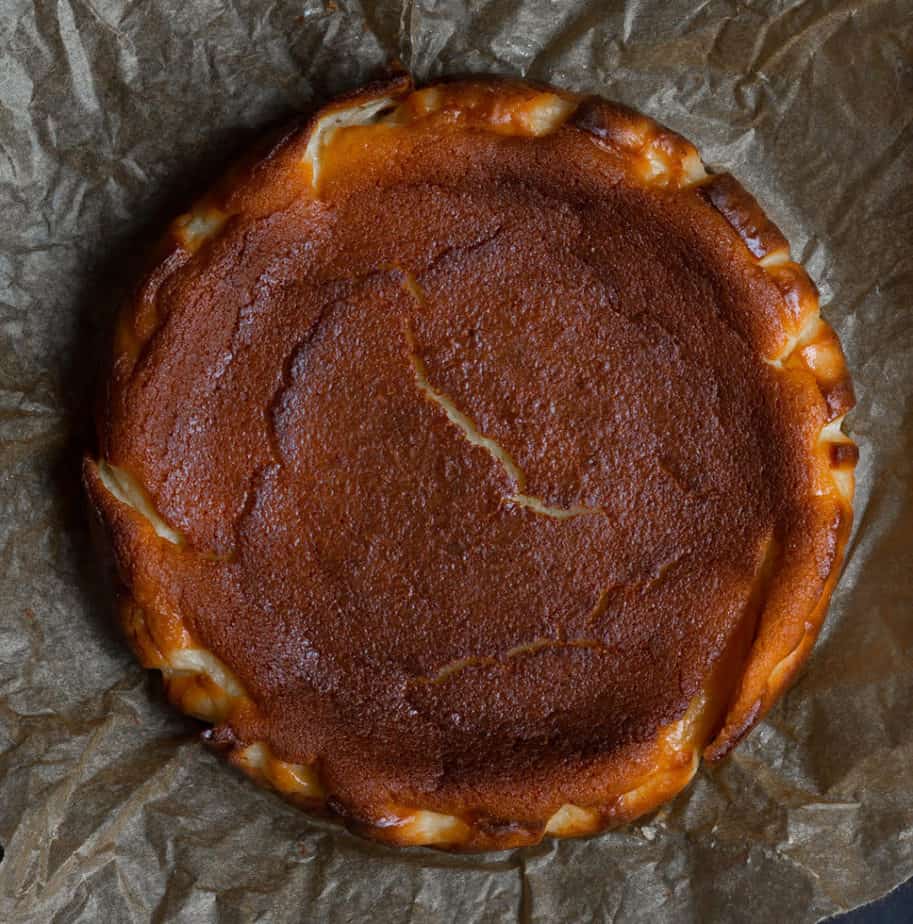
This classic Basque cheesecake might be the most fun cheesecake you’ll ever make. It takes just one bowl, five ingredients, and 20 minutes of prep. And you get a gorgeously caramelized cheesecake with a soft, custard center!
You have to throw your cheesecake playbook out for this one. We are baking it without a crust at high temperatures, which burns it and causes it to crack on purpose. All of this adds up to a gorgeous, perfectly imperfect dessert.
The texture is velvety smooth inside with a nice crust on the outside. It has a tenderly firm consistency once set. Overall, the recipe is a total winner for all dessert lovers!
Burning is the whole point of Basque-style cheesecake. That’s how you get to make a crustless cheesecake. When you bake the batter at a high temperature, the outside caramelizes. And it sets into a firm, sturdy edge that compensates for the crust.
Caramelization also gives it a toffee-ish flavor on top with rich, creamy sweetness inside. In short? Burning is the magic. Embrace it. It’s what makes Basque cheesecake so easy, so unique, and so irresistibly delicious.
Why You’ll Love This Recipe
✨Adapted from the iconic Bon Appétit, this burnt Basque cheesecake beauty is rustic, rich, and wonderfully simple. I added a splash of homemade vanilla extract. It’s a small touch, but it adds warmth and depth that takes the flavor to another level.
✨It’s a foolproof recipe that comes together with just a handful of ingredients. No crust, no water bath, no stress. Yet what comes out of the oven is an effortlessly elegant, creamy dessert that tastes like you spent hours on it.
✨Classic Basque cheesecake is make-ahead friendly. It needs time to set, which makes it perfect for prepping a day in advance and ideal for dinner parties, celebrations, or lazy weekends.
Reader Love ❤️
This was such a convenient and easy recipe to follow. Added cinnamon to it. Tasted delicious and was eaten up in no time! Next time I'll add chai masala and see how that comes out. Thank you for the lovely recipe.
Loved it!! So easy to make and the flavor was so intriguing! Tasted like cheese cake but had a suttle hint like custard pie and flan too!! The taste buds did the happy dance!! Thank you! ????
Basque Cheesecake Ingredients
Cream cheese is the soul of the burnt Basque cheesecake recipe. Use full-fat cream cheese and you’ll have the silkiest texture. Make sure it’s softened and at room temperature, so it blends easily. Homemade cream cheese is a great choice. But store-bought works too.
Sugar sweetens the cheesecake and helps with caramelization to get that signature burnt top.
Eggs give the classic Basque cheesecake its structure and custard-like creaminess. Room-temperature eggs work best.
Cream adds lusciousness and a light, melt-in-the-mouth feel.
Flour: Just enough all-purpose flour to help the burnt Basque cheese cake set.
Stir in a tablespoon of coffee powder with the flour, like I did for my espresso cheesecake, to make a coffee-flavored Basque burnt cheesecake.
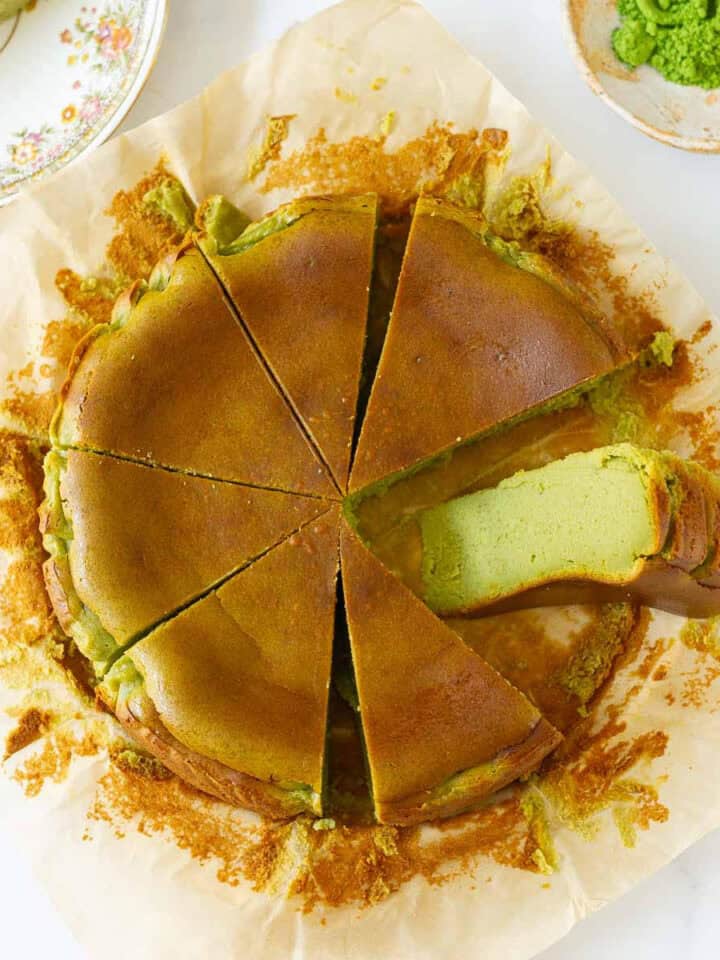
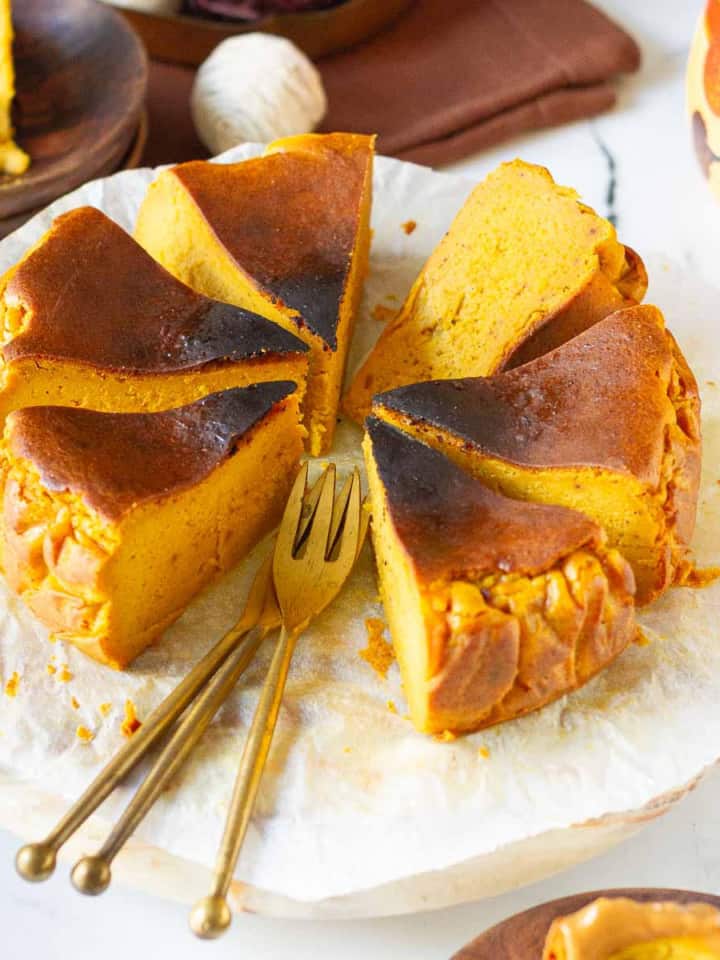
Make an earthy, creamy, and unique matcha Basque cheesecake or a perfect Fall pumpkin Basque cheesecake.
Fold in a handful of fresh or frozen blueberries for a fruity contrast and make blueberry burnt Basque cheesecake.
How To Make Classic Basque Cheesecake?
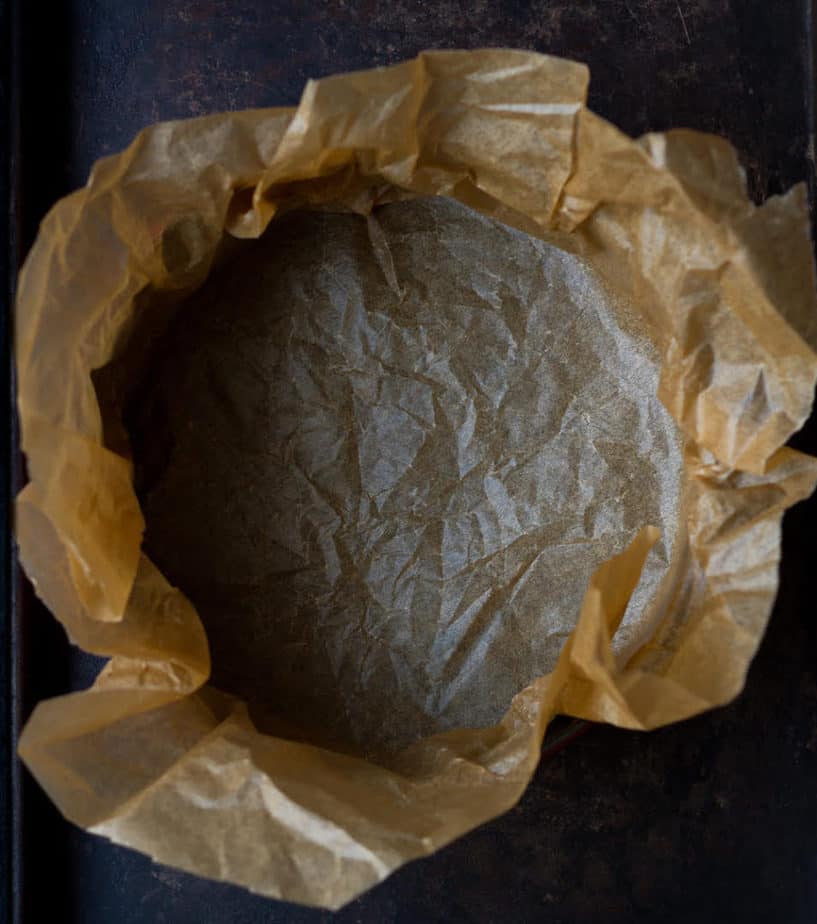
Step 1: Set your oven to preheat, and take a sheet of parchment paper and press it into your springform pan, making sure it covers the bottom and sides. Press it well.
Step 2: In a large mixing bowl, blend cream cheese and sugar using a hand mixer on low speed. Mix for 2–3 minutes until the sugar fully dissolves and you get a smooth, creamy texture.
Step 3: Add the eggs, one at a time, mixing well between each addition. Eggs give the cheesecake its signature rise and fluffy texture, so don’t rush this step.
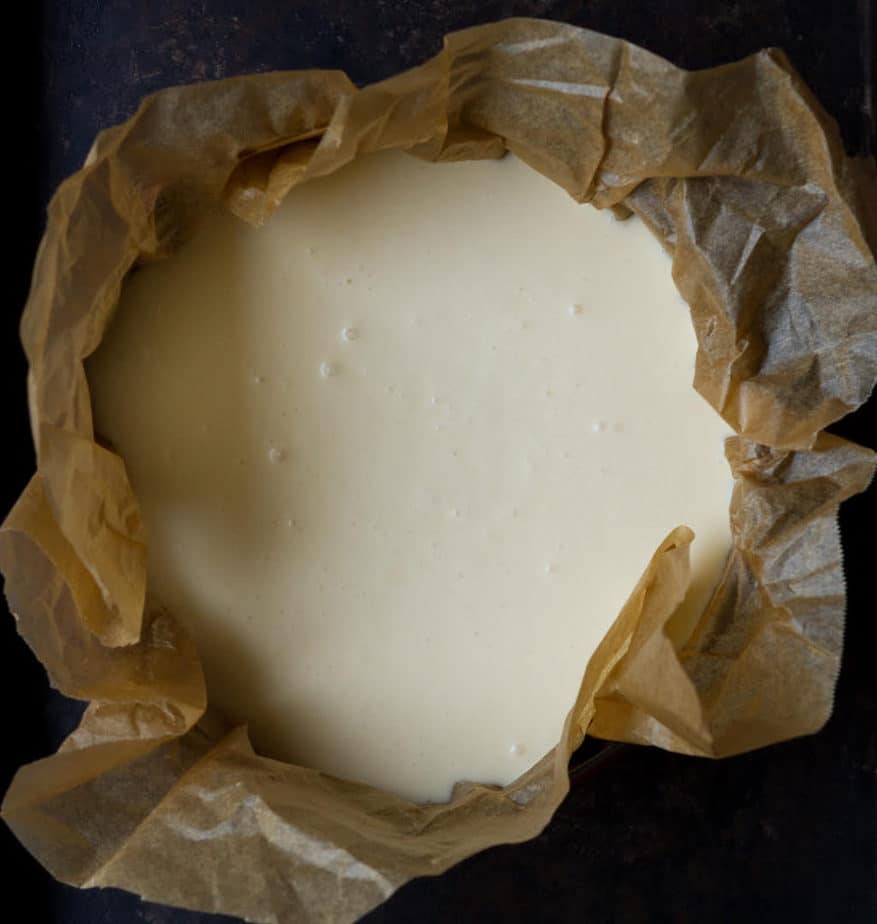
Step 4: Add in the cream, flour, and vanilla extract. Whisk just until the batter is smooth and well combined. The consistency should be pourable, not thick.
Step 5: Pour the batter into your prepared pan. Give it a gentle tap on the counter to release any air bubbles.
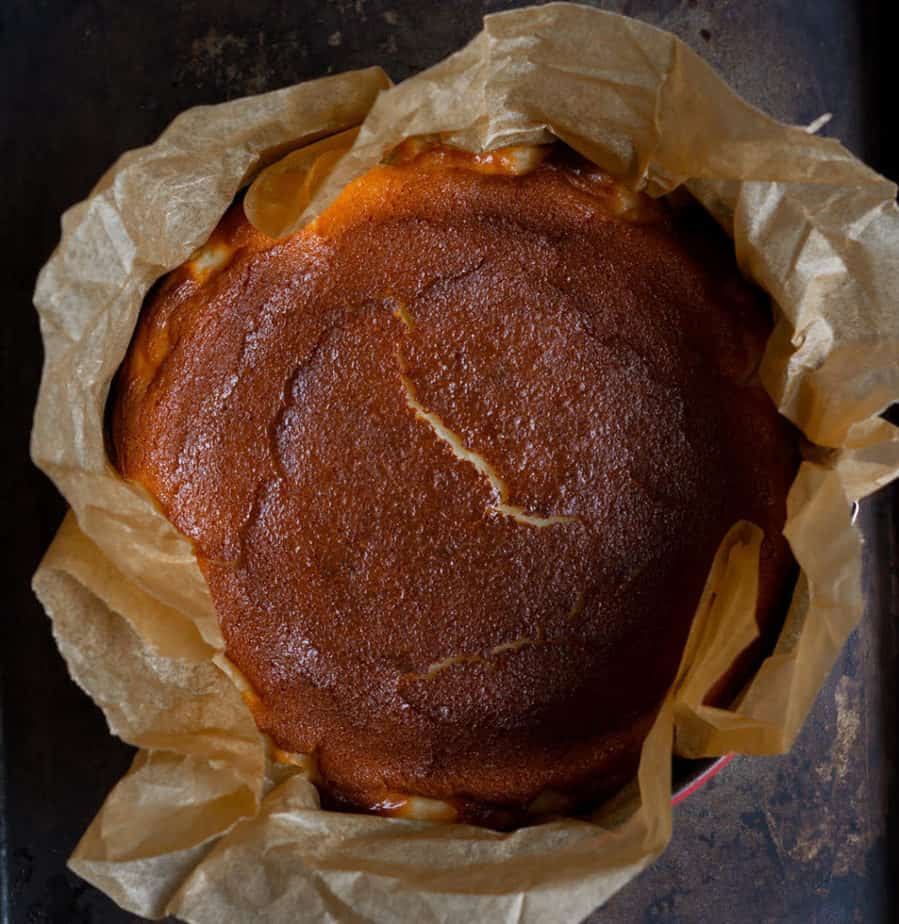
Step 6: Place it in the oven and bake for 50 to 60 minutes. Check at the 50-minute mark. The cheesecake should be deep golden brown on top, with a slight jiggle in the center.
Step 7: Let the cheesecake cool in the pan. It will deflate and crack a bit. Don’t worry, that’s exactly what gives Basque cheesecake its rustic charm.
Step 8: Set the classic Basque cheesecake in the refrigerator overnight.
Final Step: Slice, serve, and enjoy!
Pro Tips
Line your pan properly. This step is crucial. A well-lined pan helps the cheesecake hold its shape. And don't worry about smoothing out the parchment paper. The crinkly paper gives a lovely rustic look to the cheesecake.
Don’t use separate parchment papers for the base and sides. The batter will seep through the fine gaps. Instead, use a large sheet of parchment paper.
Leave a 2-inch overhang. A classic Basque cheesecake rises significantly while baking. Letting the parchment hang over the edges by at least 2 inches contains the rise and avoids spills.
I used an 8-inch springform pan, but a 6-inch pan works beautifully too, if you want a taller cake.
A runny batter is a good sign. Don’t worry if the batter seems a little loose. That’s exactly the texture you want before it goes into the oven.
Please use a kitchen scale to measure the ingredients. This ensures consistent and better results every time.
Allow the cheesecake to chill in the refrigerator for at least 6 hours for it to set properly.
How to Serve
Once the Basque-style cheesecake has cooled and set completely (preferably overnight), gently remove it from the pan and peel off the parchment paper. Then serve as-is. It’s a showstopper and needs no frills.
But if you're in the mood for a little extra, a light dusting of icing sugar adds a pretty finish. Want the creamiest texture? Let it sit at room temperature for 15–20 minutes before serving. As with all cheesecakes, I recommend making this a day in advance. This will give you ample time to let it set.
Recipe FAQs
Where did Basque Burnt cheesecake originate?
The origins of Basque burnt cheesecake are from La Viña a small restaurant in San Sebastián, Spain, that’s been running for over 60 years. It’s called Basque cheesecake because the region is Basque region. The classic Basque cheesecake from La Viña was custardy, oozy, and more pudding-like in the center. Most home-baked versions, including mine, are a bit more set and sliceable, closer to the cheesecakes we’re used to.
What is the flavor of Burnt Basque Cheesecake?
The flavor of burnt Basque cheesecake is caramel-y. But it’s the delicate, rich, velvety texture that makes it a total winner. It’s a dreamy combination of custard and cheesecake- fluffy but firm.
How do I know Basque cheesecake is done?
Your cheesecake should be deep golden-brown on top and puffed up high in the oven. When you give the pan a gentle jiggle, the center should wobble slightly, but the edges should look set. As it cools, the cake will collapse and settle. This is totally normal. Let it cool completely in the pan, then refrigerate it for several hours or overnight for the best texture.
Is Burnt Basque Cheesecake eaten hot or cold?
A classic Basque cheesecake is best served at room temperature. Once chilled and set, take it out of the fridge 15–20 minutes before serving. Although you can eat it cold too.
Half the joy of cooking is sharing it with others.That’s why I’m always eager to hear from you. So go right ahead & drop a comment or reach out on Instagram, Pinterest, YouTube, or Facebook. I hope you love this burnt Basque cheesecake as much as we do!
This classic Basque cheesecake might be the most fun cheesecake you’ll ever make. It takes just one bowl, five ingredients, and 20 minutes of prep. And you get a gorgeously caramelized cheesecake with a soft, custard center!
Line your baking pan with parchment paper. Make sure the paper comes at least 2" above the sides of the pan.
In a large bowl, beat together the cream cheese and sugar, until the cream cheese is creamy and sugar is dissolved.
Add the eggs, one at a time. Make sure each egg is incorporated well before adding the next one.
Whisk in the cream, all purpose flour and vanilla extract, until smooth.
This is a thin batter.
Pour into the prepared pan and bake for 50-55 minutes, until the cake is browned on top, but still jiggly in the center.
Let the cake cool in the pan for 30-40 minutes, then transfer to the refrigerator for it to set completely, for about 8-10 hours. I prefer to refrigerate this cake overnight.
Gently remove the cake from the pan and peel the parchment paper away from the cake. Serve cold or at room temperature. Enjoy!
Notes
Line your pan properly. This step is crucial. A well-lined pan helps the cheesecake hold its shape. And don't worry about smoothing out the parchment paper. The crinkly paper gives a lovely rustic look to the cheesecake.
Don’t use separate parchment papers for the base and sides. The batter will seep through the fine gaps. Instead, use a large sheet of parchment paper.
Leave a 2-inch overhang. A classic Basque cheesecake rises significantly while baking. Letting the parchment hang over the edges by at least 2 inches contains the rise and avoids spills.
I used an 8-inch springform pan, but a 6-inch pan works beautifully too, if you want a taller cake.
A runny batter is a good sign. Don’t worry if the batter seems a little loose. That’s exactly the texture you want before it goes into the oven.
Please use a kitchen scale to measure the ingredients. This ensures consistent and better results every time.
Allow the cheesecake to chill in the refrigerator for at least 6 hours for it to set properly.
Cakes are the best gift which contribute happiness in any special occasion of life, my wife has very fond of cakes, so on my upcoming anniversary i plan to make cake for her, After reading your blog i prepare this anniversary cake for loving wife. and guess what this cake make my anniversary more memorable.
This was such a convenient and easy recipe to follow. Added cinnamon to it. Tasted delicious and was eaten up in no time! Next time I'll add chai masala and see how that comes out. Thank you for the lovely recipe.


AMIT says
Great Cheesecake Recipe! Thanks for sharing this recipe with us.
Natasha Minocha says
Thank you very much, Amit! So happy. you like this.:)
Andrew Paul says
Cakes are the best gift which contribute happiness in any special occasion of life, my wife has very fond of cakes, so on my upcoming anniversary i plan to make cake for her, After reading your blog i prepare this anniversary cake for loving wife. and guess what this cake make my anniversary more memorable.
akshay malhotra says
Thank you for this informative recipe dear , i prepare this cake on my mom birthday party by own and everyone in the party like that alot.
Karishma says
This was such a convenient and easy recipe to follow. Added cinnamon to it. Tasted delicious and was eaten up in no time! Next time I'll add chai masala and see how that comes out. Thank you for the lovely recipe.
Natasha Minocha says
Thanks so much for your wonderful feedback, Karishma. Really appreciate you. Cinnamon and chai masala sound like amazing add-ins in this cake!xoxo