
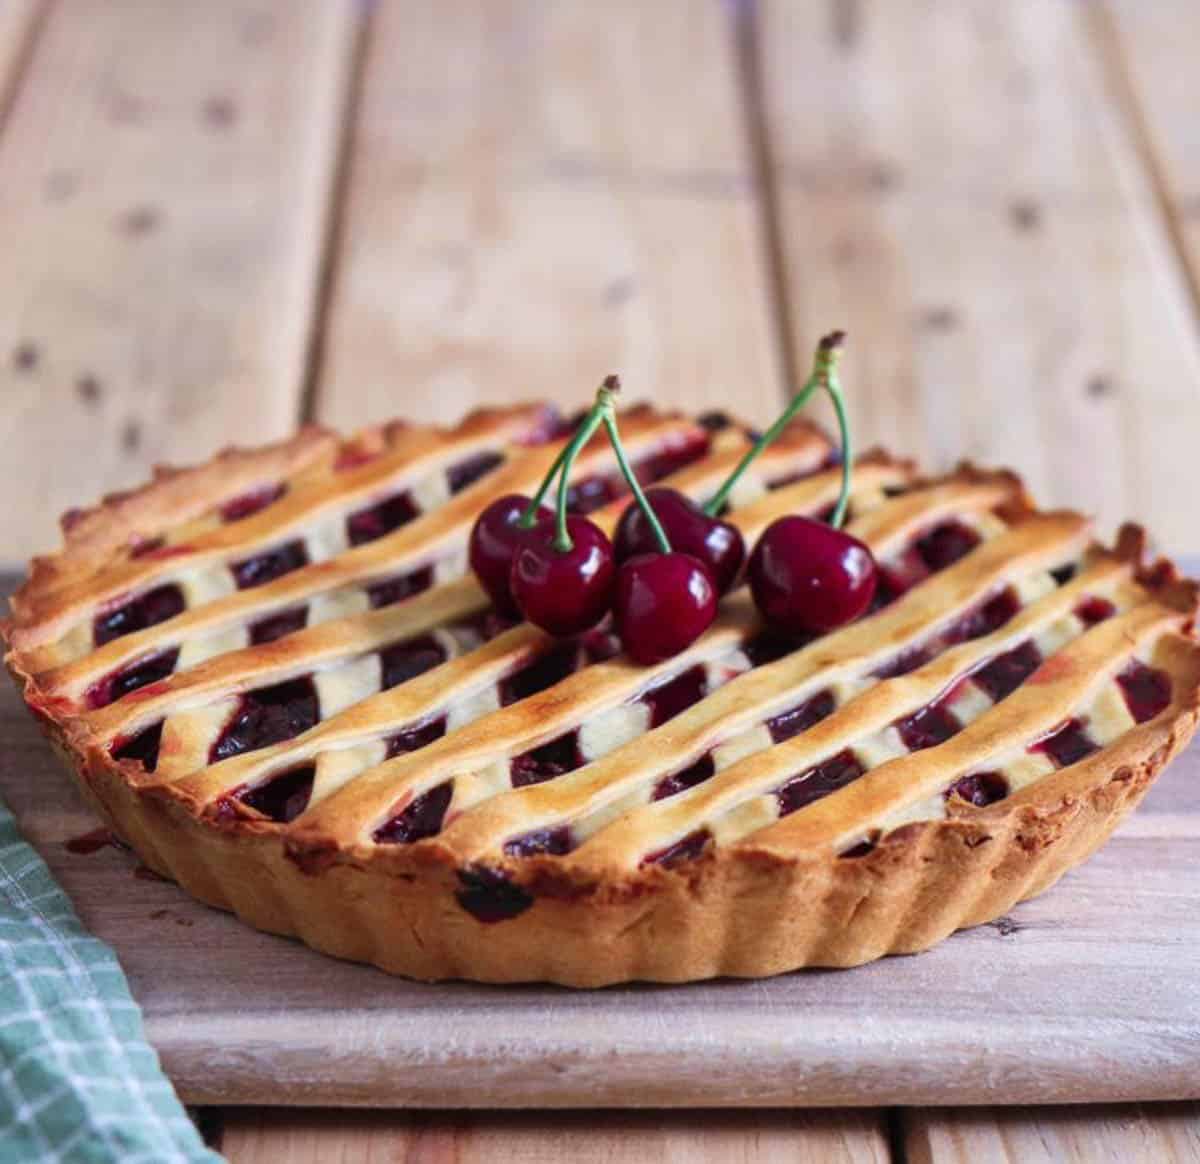
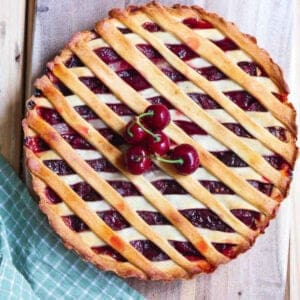
With a flaky, buttery crust, the jammiest cherry filling, and juicy tartness, this homemade cherry pie hits the right spot! Made with fresh cherries, this dreamy pie is bursting with real fruit flavor in every bite!
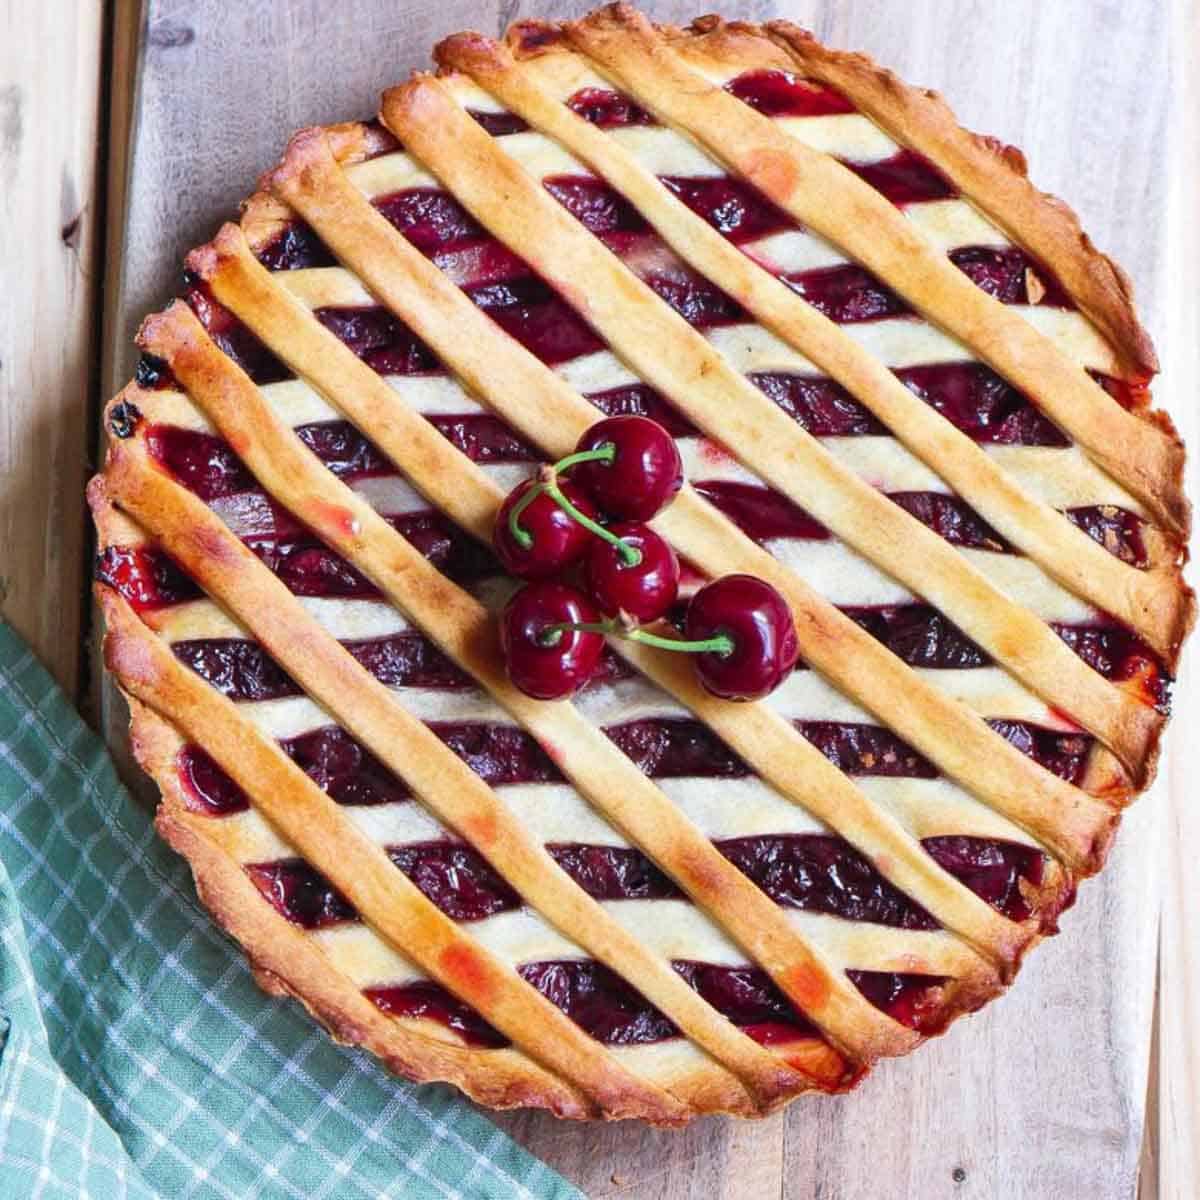
Pie making can seem intimidating, but I have simple-to-follow instructions that will help you bake this cherry pie with confidence, even if you are a new baker. I even have the easiest tips for making the lattice top!
No fancy techniques, no canned filling. Just fresh, homemade cherry filling and a delicious crust made from scratch!
Jump to:
Why You’ll Love This Recipe
✨Cherry pie is summer on a plate. The flaky golden crust, the glossy cherry filling, the just-right sweetness. It’s one of those desserts that feels fancy but is super doable at home. You’ll love making (and eating) it.
✨Zero fancy ingredients are needed. Just pantry staples and some ripe, luscious cherries.
✨The recipe is beginner-friendly and flexible. Don’t want to make a lattice top? No problem. Just cover the pie with rolled out pastry dough, make slits and bake! Or skip the top crust entirely and make a rustic cherry galette.
Recipe Ingredients
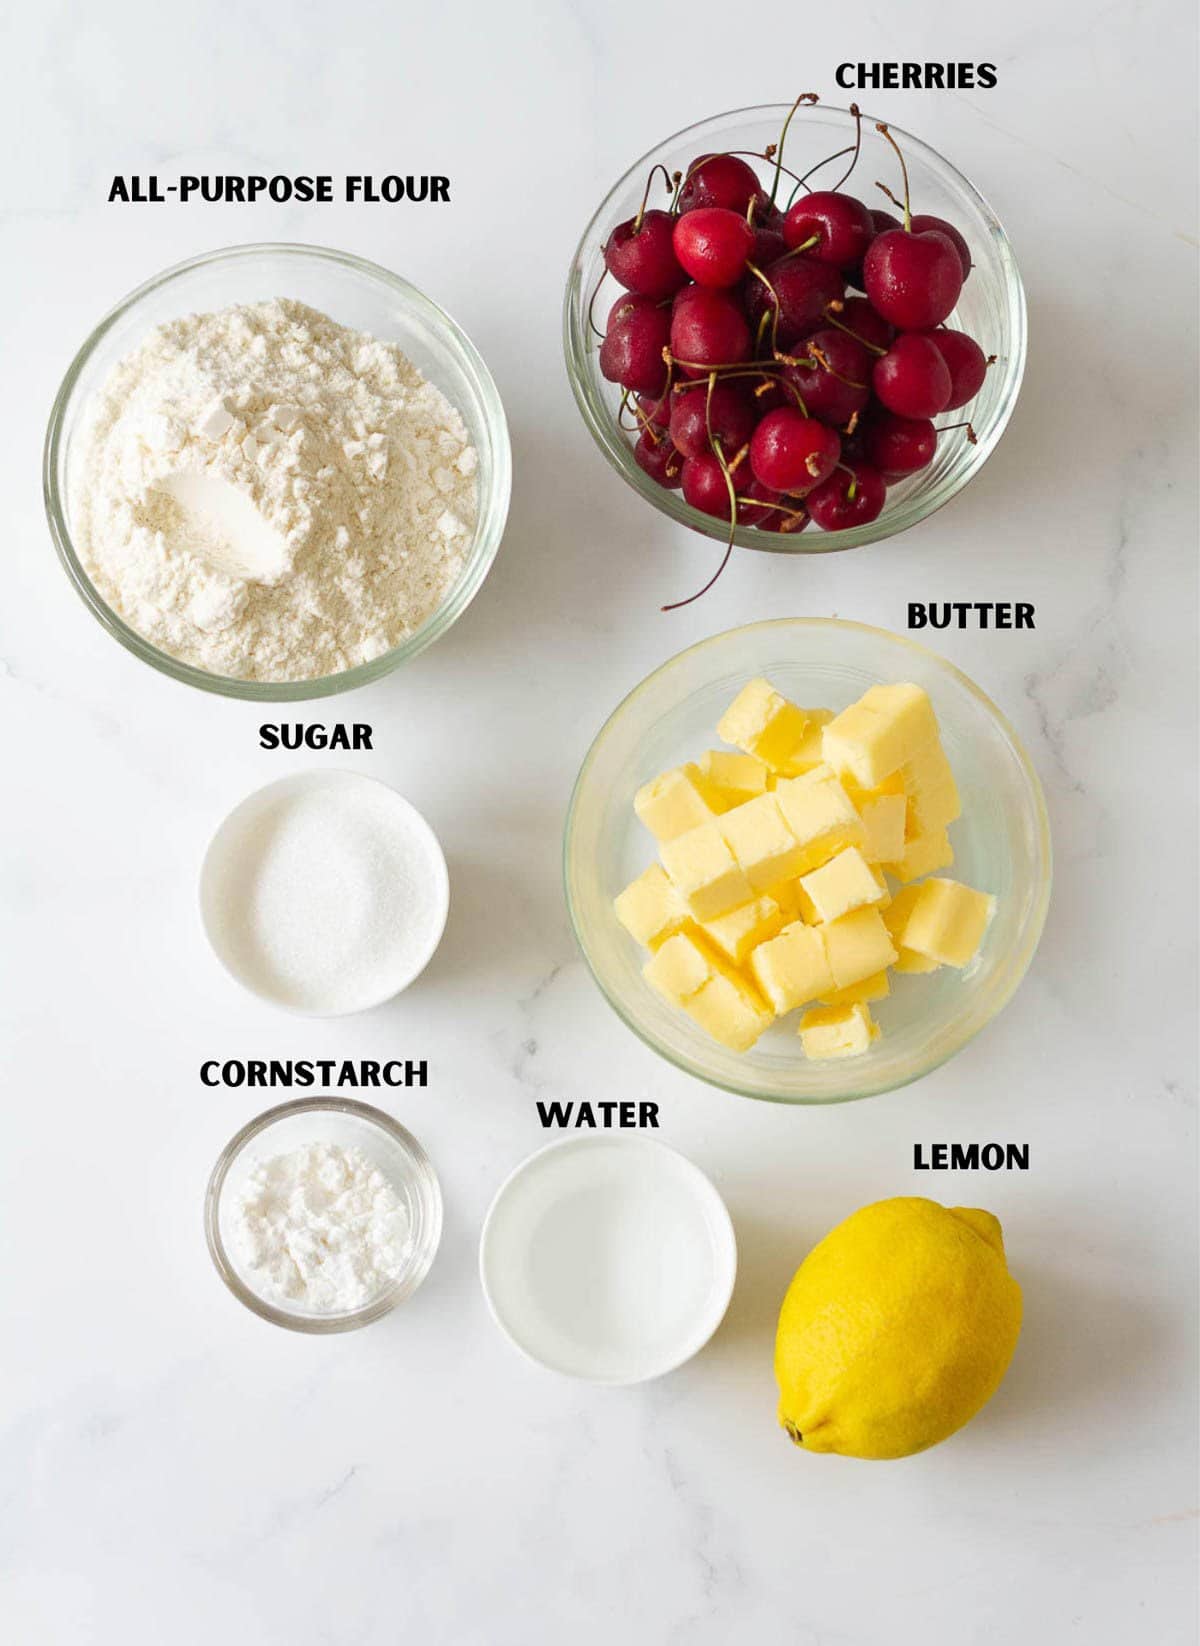
Flour: I used all-purpose flour in this recipe for a flaky, tender pastry, like in my easy walnut pie. But I have baked this pie with whole wheat flour, too. It gives a slightly nuttier flavor. You can use either or combine the two!
Butter: I used salted butter. The key is to keep it cold so your crust turns out flaky.
Sugar: Use granulated sugar to sweeten the cherry pie dough and help it brown up nicely. You can use a cane or raw sugar, too.
Cherries: Fresh or frozen cherries. Sweet or sour. Everything works. Adjust the sugar level accordingly.
Cornstarch thickens the juices as the pie bakes and makes a juicy (not runny) cherry pie filling.
Lemon juice brightens the flavors and balances out the sweetness.
Please see the recipe card for full information about ingredients and quantities.
Substitutions
Flour: You can make gluten-free cherry pie by using buckwheat flour as I did for apple marzipan galette, chai spiced plum galette, and mulberry pie.
Fat: I made the pie crust with butter for this fresh cherry pie recipe, but go ahead with coconut oil (chilled) or plant-based butter to make it vegan.
How To Make Cherry Pie
Step 1: Keep an 8" pie pan handy and preheat the oven to 180C.
Step 2: Combine the flour and sugar in a large bowl. Rub the chilled butter into the mixture using your fingertips.
Step 3: When it resembles coarse breadcrumbs, add iced cold water, 1 tablespoon at a time, just enough to bind the dough. The dough should easily clump together in your hands.
Step 4: Using the palm of your hand, work the dough by pushing it away from you 4-5 times until it's smooth.
Step 5: Roll it into a ball and flatten it into a disk. Wrap in cling wrap and refrigerate until ready to use. This should rest for at least an hour.
Step 6: Combine the pitted cherries, sugar, cornstarch, and lemon juice in a bowl.
Step 7: Unwrap the dough and flour your work surface well. Divide the dough into 2/3rd and 1/3rd parts.
Step 8: Working with the bigger part, roll it out into a 9" circle. Place the dough gently into the pie pan. Trim the edges of the pastry to fit the sides of the pan.
Step 9: Spoon the cherry filling into the pie. Leave out most of the liquid collected at the bottom of the bowl.
Step 10: Combine the pie trimmings with the remaining pie dough. Roll it out into a 10" circle. Using a sharp knife, cut into 16 strips.
Step 11: Lay 8 strips of dough on the pie filling in one direction.
Step 12: Crimp the edges of the strips with the pastry lining the pan. Now, lay the balance of 8 strips of dough crosswise across the filling. Again, crimp the pastry edges.
Step 13: Brush with melted butter, cream, or beaten egg.
Step 14: Bake for 30 -35 minutes or until the pastry is golden brown and the juices are bubbling.
Final Step: Allow the pie to cool for a couple of hours before slicing and serving.

Pro Tips
- Keep everything cold. That includes the butter, the water, and even the flour. Cold ingredients = flaky crust. Add a couple of ice cubes to your water to make sure it’s chilled.
- When spooning the cherry filling into the pie crust, leave out most of the water pooled at the bottom of the bowl. Excess water can make the pie soggy.
- For a thicker filling, you can strain the cherry filling and cook the leftover water in a small saucepan until it thickens. Then pour this over the cherries. This is a great tip from Sally's Baking Addiction!
- Don’t overwork the dough. You don't need to knead it. Just pull it all together. It should feel a bit sticky and moist. Not dry. If you overmix, it can turn tough.
- Tent with foil if needed. If your crust starts browning too quickly while the filling still needs time to bubble, lightly cover the top with foil. That way, you won’t end up with a burnt top and undercooked filling.
- Let the cherry pie cool completely. I know it’s tempting, but slicing too soon will make the filling run all over the place. Give it time to set properly. A fully cooled homemade cherry pie gives you a clean, picture-perfect slice.
- Please use a kitchen scale for measuring your ingredients. This ensures better and consistent results every time.
How To Serve
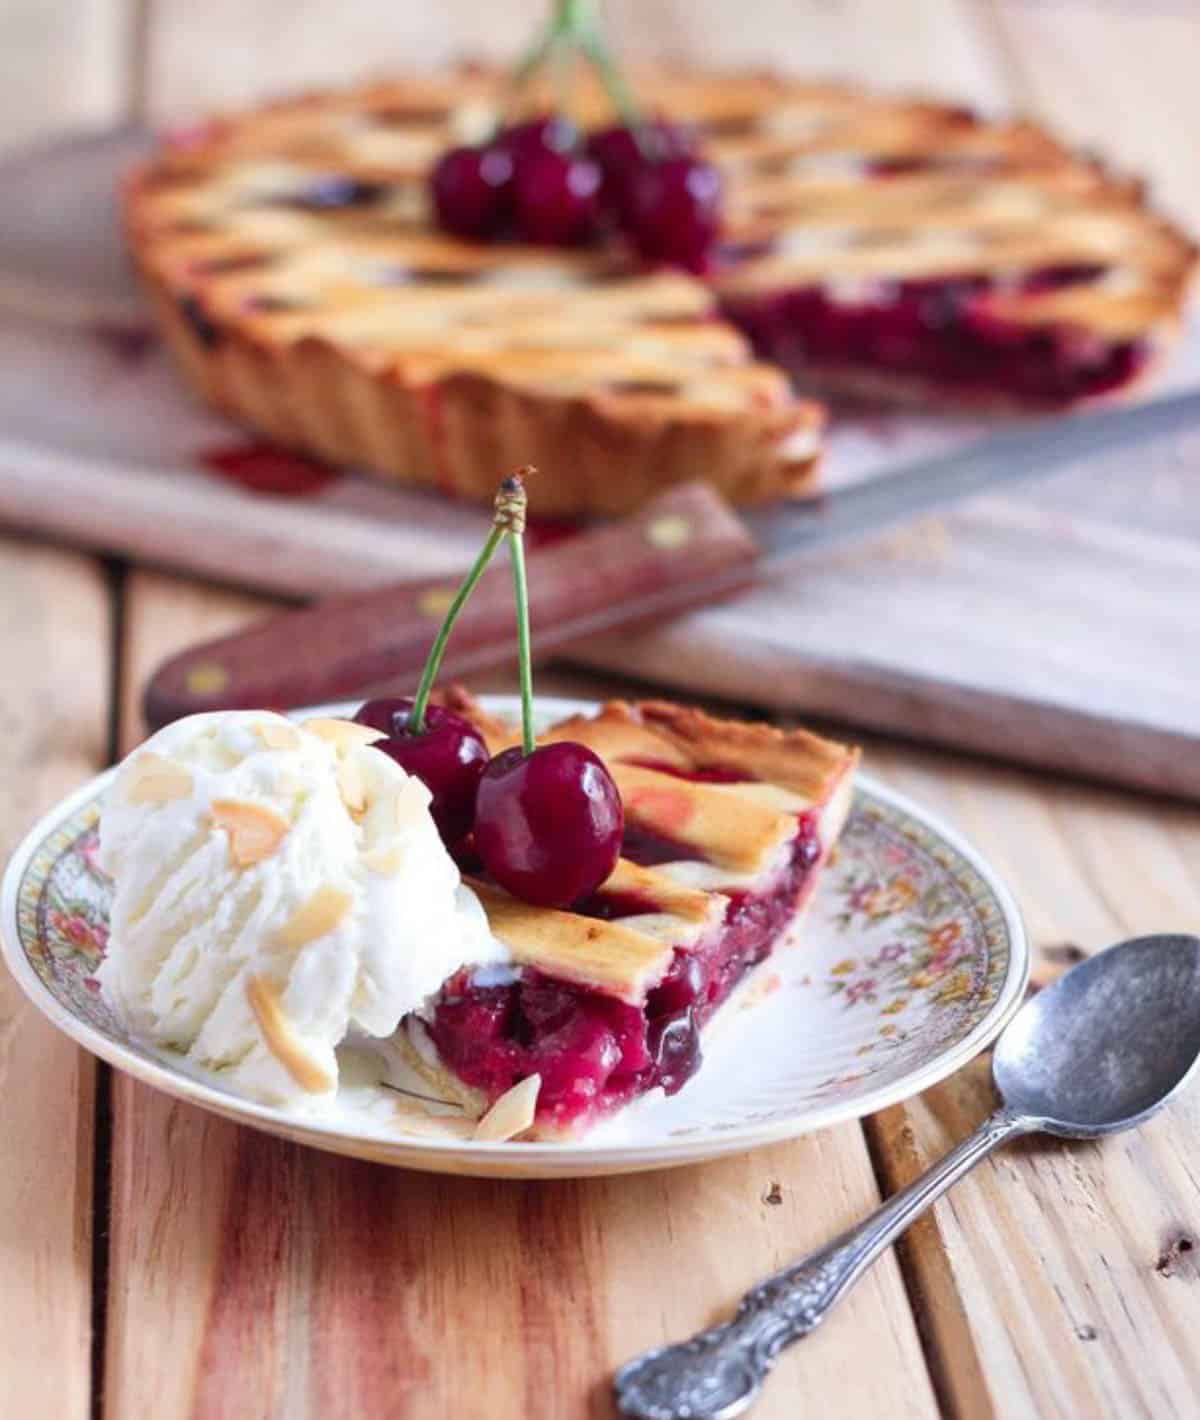
As with all pies, this cherry pie is a dream with a scoop of vanilla ice cream or chocolate ice cream. It's also lovely with a dollop of whipped cream or custard.
Cherry pie is best served warm, but I’ll be the first to admit I absolutely love it cold- straight from the fridge!!
Recipe FAQs
In this recipe, there is no need to pre-bake the crust! The pie bakes beautifully without it. (If you're curious about par-baking technique, please see my mushroom quiche recipe)
Look for visual cues to check if your pie is done. The crust should be beautifully golden, and the cherry filling bubbling through. Typically, it takes around 30 to 35 minutes, but always keep an eye out during the last 10 minutes. If the crust starts browning too fast, tent it with foil.
Once your pie has cooled completely, cover it loosely with foil or plastic wrap. It’ll stay fresh at room temperature for about 2 days. If you want to keep it longer, pop it into the fridge. The pie keeps well for 4–5 days refrigerated. Just bring it to room temperature or give it a quick warm-up before serving again.

📖 Recipe
Cherry Pie
Ingredients
Pie Crust
- 1.5 cups All-purpose flour
- 1/2 cup Butter, chilled, cut into cubes I used salted butter
- 1 tbsp Sugar
- 3-4 tbsp Chilled water
Cherry Filling:
- 2.5 cups Cherries, pitted
- 1/3 cup Sugar
- 1.5 Tbsp Cornstarch
- 2 tsp Lemon juice
Instructions
Crust:
- Combine the flour and sugar in a large bowl. Rub the chilled butter into the mixture, using your fingertips. When it resembles coarse breadcrumbs, add iced cold water, 1 Tbsp at a time, just enough to bind the dough. The dough is ready when it clumps together easily in your hands.Using the palm of your hand, push the dough away from you 4-5 times until it's smooth.
- Roll into a ball and flatten it into a disk. Wrap in cling wrap and refrigerate until ready to use. This should rest for at least an hour.
- When you’re ready to bake, keep an 8" pie pan handy and preheat the oven to 180C.
Filling:
- Combine the pitted cherries, sugar, cornstarch, and lemon juice in a bowl.
Assembly:
- Unwrap the dough and flour your work surface well. Divide the dough into 2/3rd and 1/3rd parts.
- Working with the bigger part, roll it out into an 9" circle. Place the dough gently into the pie pan. Trim the edges of the pastry to fit the sides of the pan.
- Spoon the cherry filling into the pie. Leave out most of the water that would have collected at the bottom of the bowl.
- Combine the pie trimmings with the balance pie dough. Roll it out into an 10" circle. Using a sharp knife, cut into 16 strips. Lay 8 strips of dough on the pie filling in one direction.Crimp the edges of the strips with the pastry lining the pan. Now lay the balance of 8 strips of dough crosswise across the filling. Again crimp the pastry edges. Brush with melted butter or cream or beaten egg.
- Bake for 30 -35 minutes or until the pastry is golden brown and the juices are bubbling. Allow the pie to cool for a couple of hours before slicing and serving. Enjoy!
Notes
- Keep everything cold. That includes the butter, the water, and even the flour. Cold ingredients = flaky crust. Add a couple of ice cubes to your water to make sure it’s chilled.
- When spooning the cherry filling into the pie crust, leave out most of the water pooled at the bottom of the bowl. Excess water can make the pie soggy.
- For a thicker filling, you can strain the cherry filling and cook the leftover water in a small saucepan until it thickens. Then pour this over the cherries. This is a great tip from Sally's Baking Addiction!
- Don’t overwork the dough. You don't need to knead it. Just pull it all together. It should feel a bit sticky and moist. Not dry. If you overmix, it can turn tough.
- Tent with foil if needed. If your crust starts browning too quickly while the filling still needs time to bubble, lightly cover the top with foil. That way, you won’t end up with a burnt top and undercooked filling.
- Let the cherry pie cool completely. I know it’s tempting, but slicing too soon will make the filling run all over the place. Give it time to set properly. A fully cooled homemade cherry pie gives you a clean, picture-perfect slice.
- Please use a kitchen scale for measuring your ingredients. This ensures better and consistent results every time.


Vandita says
Hi Natasha,
Have made this pie with so many fruit options. Thank you for sharing. Have a query my dough gets quite hard when I roll out and then gets cracked . Any pointers to what we can do to avoid that. Should I mix half WWF & APF ?
Natasha Minocha says
Hi Vandita, thank you for your interest in this recipe!
If your dough gets hard, then you can do either of the following things:
1. Increase the quantity of butter by 10-15 gms
2. Add an egg or some cream to the flour after you have added the butter
3. You can certainly mix ap flour with your wwf. Or make it entirely with APF.
Hope this helps. I'd love to hear if any of these tricks helped with a better dough.
Have a great day! xx